So it is finally here, the new release Mnemosyne 1.3.0!

It’s a new update and it’s has only been…
2 years… ah…
Well, it’s been a long time coming then because this release brings some amazing new features and improvements to your Amiga computers!!
Firstly tho I want to say a huge thank you to some people who gave me various ideas and suggestions for this release, they are:
- Flype
- Bubbob42
- Amikit
- Walkero
And various others who have given me feedback and suggestions over the years, thank you all so much for your support and ideas, it really does help me to make this project better and to stay motivated to continue working on it <3
But lets get into the new features!!

The features:
The graph.
Yes! Finally, Mnemosyne has the ability to have a graphical representation of your folders, allowing you to see exactly which directories are taking up the most space in your system.
Each folder and file is represented by a colored square on the left side of the GUI, and the color of the square is also shown on the graph, so you can easily see which folder is which. The bigger the square, the more space that folder is taking up on your system.
The graph can then be resized by scaling the window so you can see more details.
It can be enabled/disabled in the settings menu or by adding the tooltype ENABLEGRAPH.
The bottom text change:
First things first, we have changed the way the bottom text area works now, allowing you to see exactly which folder Mnemosyne is currently scanning!
Note tho that it shows the names of folders in the current directory, not subfolders. This is because each update to the bottom text area takes some time to process and affects performance, so I decided to only show the current layer and not subfolders.
You might also see a little easter egg hiding there sometimes :D
The new Stop Button:
Yes, yes, finally, this was added after trying to painfully find a way to be able to stop the scanning process.
This was not easy because the scanning process freezes the GUI as it utilizes all available resources to scan the files as quickly as possible.
So no listening events, no button presses, no msgports, nothing.
But I think I was able to find a way to do it, and now you are able to stop the scanning process!
Once you press the “Scan” button, a new window will pop up with “Mnemosyne Scanning…”. This window is tied to the main Mnemosyne window, and upon closing it, the scanning process will be stopped, and the main window will be re-enabled.
Keyboard shortcuts for the menu:
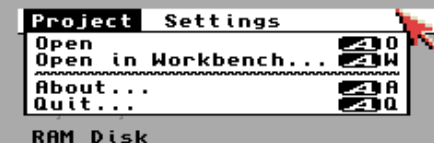
Keyboard shortcuts have been added to the menu so you can now use the keyboard to navigate the menu and select options.
The keyboard shortcuts are as follows:
Icons can now be dragged and dropped into the window:
Yes! This is another feature that has been requested, and it is actually such a quality-of-life improvement.
You are now able to drag any icon from the Workbench and drop it into the Mnemosyne window, and it will be ready to scan that folder.
If you drop a file instead of a folder, Mnemosyne will scan the folder that the file is in.
Mnemosyne now has an OOM (Out of Memory) handler:
Yes! This is a very important feature that has been added to Mnemosyne; it will now handle situations where the system runs out of memory and will display a message to the user instead of crashing the application.
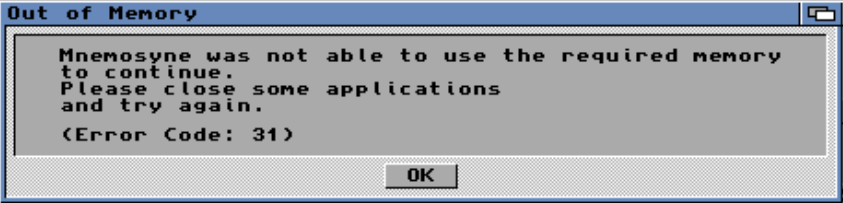
It will also display an error code, which can be very helpful for debugging and finding out what went wrong, as it points to the exact place where the error occurred in the code.
Fixed various bugs and issues:
- Fixed issue were Mnemosyne would not update the bottom text by itself.
- Fixed issue where Mnemosyne would not store settings correctly if it was stored in a folder.
- Fixed various memory leaks
- Fixed workbench 000000 info bug
Improvements to code quality using clang-format
This was an improvement that I wanted to do for a long time. Tho it doesn’t affect the end user, it is a very important improvement to the code quality of Mnemosyne.
What is clang-format?
Clang-format is a tool that automatically formats C/C++/Java/JavaScript/Objective-C/Protobuf code according to a set of style guidelines. It helps maintain consistent coding style across a project, making the code easier to read and understand.
The coding style guidelines are stored in a file called .clang-format which is included in the Mnemosyne source code.
I was able to use clang-format in my docker4AmigaVBCC container by installing it through apt. And since my container is persistent, I wouldn’t need to install it again and again.
apt install clang-format
Then I was able to make a rule in my Makefile to run clang-format on all the source code with make format:
format:
 @clang-format -i src/*.c src/*.h
Conclusion

I am very happy to be able to finally release this new version of Mnemosyne. It has been a long time coming, and it will be available for download on https://aminet.net/package/util/misc/Mnemosyne and the source code on my github at https://github.com/arisamiga/mnemosyne if you would like to take a look.
I am so grateful to be able to work on this project and I hope I was able to create some features that will be useful to you and your amiga computers!!
So once again. I shall see you at the next one! I hope you enjoyed this post and thank you so much for your incredible support, and thank you so much for reading! :D