So today we are back to our amazing show of “I Can Make That” where Aris tries to make something amazing or totally useless!!
This time our topic is “Wishlists”!
cough
Anywaysss!
Today we will be making a wishlist!
I was introduced to the concept of wishlists but especially the concept of online wishlists.
This was an interesting concept as one of my friends asked me to make one so they could see what I wanted for my birthday.
So I thought instead of using one of the many wishlist websites that are fully tested, secure, and already known to put my wishlist on, I would make my own! (I know right what could go wrong)
So one of my initial thoughts was to make some sort of website that holds a list of items that I want and then I could share it with my friends but also I would be able to add, remove, and list items on the list in a very easy way like perhaps through a discord bot or something.
I started to think about how I would make such a website and what I would need to do to make it work.
I would also like to be able to not use a backend for this project as I would like to keep it as simple as possible.
So I started to think about how I would be able to make this and I decided to start by working with the creation of a discord bot.
I decided instead of making a separate page with authentication I would use a discord bot to manage the wishlist using slash commands.
So Firstly I made a discord bot which I invited to a server that I would be controlling the wishlist from.
Then I started by creating some basic slash commands that would allow me to add, remove, and list items on the wishlist. And also to make it easier to manage the slash commands I used a command handler.
require("dotenv").config();
const fs = require("node:fs");
const path = require("node:path");
const {
  REST,
  Routes,
  Client,
  Collection,
  GatewayIntentBits,
} = require("discord.js");

var token = process.env.TOKEN;

const client = new Client({ intents: [GatewayIntentBits.Guilds] });

const commands = [];
client.commands = new Collection();

const foldersPath = path.join(__dirname, "commands");
const commandFolders = fs.readdirSync(foldersPath);

for (const folder of commandFolders) {
  const commandsPath = path.join(foldersPath, folder);
  const commandFiles = fs
    .readdirSync(commandsPath)
    .filter((file) => file.endsWith(".js"));
  for (const file of commandFiles) {
    const filePath = path.join(commandsPath, file);
    const command = require(filePath);
    if ("data" in command && "execute" in command) {
      commands.push(command.data.toJSON());
      client.commands.set(command.data.name, command);
    } else {
      console.log(
        `[WARNING] The command at ${filePath} is missing a required "data" or "execute" property.`
      );
    }
  }
}

client.login(token);
Note that the commands have to always be registered using a REST API call to the discord API so they can be accessed.
// Construct and prepare an instance of the REST module
const rest = new REST().setToken(token);

(async () => {
  try {
    console.log(
      `Started refreshing ${commands.length} application (/) commands.`
    );

    const data = await rest.put(
      Routes.applicationGuildCommands(
        process.env.CLIENT_ID,
        process.env.GUILD_ID
      ),
      { body: commands }
    );

    console.log(
      `Successfully reloaded ${data.length} application (/) commands.`
    );
  } catch (error) {
    console.error(error);
  }
})();
As with that command handler we can now create commands under /commands/ and they will be automatically registered with the discord API.
Here is a example of a ping command:
const { SlashCommandBuilder } = require("@discordjs/builders");

module.exports = {
  data: new SlashCommandBuilder()
    .setName("ping")
    .setDescription("Replies with Pong!"),
  async execute(interaction) {
    await interaction.reply("Pong!");
  },
};
Where this uses the Slash command builder to create a new command and then the execute function to run the command when it is called.
We will also need to create an event handler to handle the events that the discord bot will be listening to specifically the interactionCreate event and to watch for interaction.isChatInputCommand() to check if the interaction is a command.
if (interaction.isChatInputCommand()) {
  const command = interaction.client.commands.get(interaction.commandName);

  if (!command) {
    console.error(`No command matching ${interaction.commandName} was found.`);
    return;
  }
  try {
    await command.execute(interaction);
  } catch (error) {
    console.error(error);
    if (interaction.replied || interaction.deferred) {
      await interaction.followUp({
        content: "There was an error while executing this command!",
        flags: MessageFlags.Ephemeral,
      });
    } else {
      await interaction.reply({
        content: "There was an error while executing this command!",
        flags: MessageFlags.Ephemeral,
      });
    }
  }
}
I will be explaining about the event files in a bit!
So now we can start with creating some basic commands!
As we are gonna be making a static wishlist website we can directly edit the items in the html using a npm package like node-html-parser which allows us to parse the index.html file to be able to get the current items on the wishlist but also to edit them as well.
const { SlashCommandBuilder } = require("@discordjs/builders");
const HTMLParser = require("node-html-parser");
const fs = require("fs");
module.exports = {
  data: new SlashCommandBuilder()
    .setName("items")
    .setDescription("Get Current Wishlist Items"),
  async execute(interaction) {
    fs.readFile("../Website/index.html", "utf8", (err, data) => {
      if (err) {
        console.error(err);
        return;
      }
      const root = HTMLParser.parse(data);
      const items = root.querySelectorAll(".wishlist-item");
      const embeds = [];
      items.forEach((item) => {
        const name = item.querySelector(".item-name").text;
        const description = item.querySelector(".item-description").text;
        const image = item.querySelector(".item-img > img").getAttribute("src");
        const price = item.querySelector(".item-price").text;

        const embed = {
          title: name,
          description: `${description}\nPrice: ${price}`,
          image: {
            url: image,
          },
        };

        embeds.push(embed);
      });

      interaction.reply({ embeds: embeds });
    });
  },
};
This command will read the index.html file and then parse it to get the items on the wishlist and then return them as embeds to the user.
So now we can start by creating a command to add items to the wishlist.
Where we can use the same system by parsing the html and then rewriting the html file with the parsed values
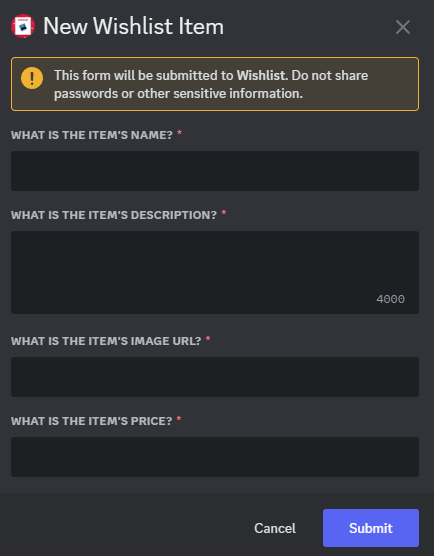
Also in this case to make it easier for the user we will be using a form that is available on DiscordJS to get each of the values that we want to add such as the name, description, image, and price.
More about how to use forms or what they call “modals” can be found here https://discordjs.guide/interactions/modals.html
const {
  ModalBuilder,
  TextInputBuilder,
  TextInputStyle,
  StringSelectMenuOptionBuilder,
  SlashCommandBuilder,
  ActionRowBuilder,
} = require("discord.js");
module.exports = {
  data: new SlashCommandBuilder()
    .setName("add")
    .setDescription("Add a wishlist item"),
  async execute(interaction) {
    const modal = new ModalBuilder()
      .setCustomId("newItemModal")
      .setTitle("New Wishlist Item");

    const itemName = new TextInputBuilder()
      .setCustomId("newItemName")
      .setLabel("What is the Item's Name?")
      .setStyle(TextInputStyle.Short)
      .setRequired(true);

    const itemDescription = new TextInputBuilder()
      .setCustomId("newItemDescription")
      .setLabel("What is the Item's Description?")
      .setStyle(TextInputStyle.Paragraph)
      .setRequired(true);

    const itemImage = new TextInputBuilder()
      .setCustomId("newItemImage")
      .setLabel("What is the Item's Image URL?")
      .setStyle(TextInputStyle.Short)
      .setRequired(true);

    const itemPrice = new TextInputBuilder()
      .setCustomId("newItemPrice")
      .setLabel("What is the Item's Price?")
      .setStyle(TextInputStyle.Short)
      .setRequired(true); // An action row only holds one text input, // so you need one action row per text input.

    const firstActionRow = new ActionRowBuilder().addComponents(itemName);
    const secondActionRow = new ActionRowBuilder().addComponents(
      itemDescription
    );
    const thirdActionRow = new ActionRowBuilder().addComponents(itemImage);
    const fourthActionRow = new ActionRowBuilder().addComponents(itemPrice); // Add inputs to the modal
    modal.addComponents(
      firstActionRow,
      secondActionRow,
      thirdActionRow,
      fourthActionRow
    ); // Show the modal to the user

    await interaction.showModal(modal);
  },
};
Note that you cannot get the values from the commands file and instead need to use the interactionCreate event to get the values from the form by checking for a interaction.isModalSubmit() and then getting the values from the interaction.
So let’s talk about events!!
But for us to do that we will also need to have a handler for the events like the one we used for the commands.
const eventsPath = path.join(__dirname, "events");
const eventFiles = fs
  .readdirSync(eventsPath)
  .filter((file) => file.endsWith(".js"));

for (const file of eventFiles) {
  const filePath = path.join(eventsPath, file);
  const event = require(filePath);
  if (event.once) {
    client.once(event.name, (...args) => event.execute(...args));
  } else {
    client.on(event.name, (...args) => event.execute(...args));
  }
}
Note for this handler you will need the filename of the event to reflect the event name that you want to listen to and also for it to be in the /events/ folder.
Like for example with /events/ready.js
const { Events, ActivityType, Client } = require("discord.js");

module.exports = {
  name: Events.ClientReady,
  once: true,
  execute(client) {
    console.log(`Ready! Logged in as ${client.user.tag}`);

    client.user.setPresence({
      activities: [{ name: `Aris's Wishlist`, type: ActivityType.Watching }],
      status: "online",
    });
  },
};
So now we can start by creating the event handler for the modal submit event.
require("dotenv").config();
const { Events, MessageFlags } = require("discord.js");
const HTMLParser = require("node-html-parser");
const fs = require("fs");
module.exports = {
  name: Events.InteractionCreate,
  async execute(interaction) {
    if (!interaction.guild) return;
    if (interaction.isChatInputCommand()) {
      const command = interaction.client.commands.get(interaction.commandName);

      if (!command) {
        console.error(
          `No command matching ${interaction.commandName} was found.`
        );
        return;
      }
      try {
        await command.execute(interaction);
      } catch (error) {
        console.error(error);
        if (interaction.replied || interaction.deferred) {
          await interaction.followUp({
            content: "There was an error while executing this command!",
            flags: MessageFlags.Ephemeral,
          });
        } else {
          await interaction.reply({
            content: "There was an error while executing this command!",
            flags: MessageFlags.Ephemeral,
          });
        }
      }
    } else if (interaction.isModalSubmit()) {
      if (interaction.customId === "newItemModal") {
        fs.readFile("../Website/index.html", "utf8", async (err, data) => {
          if (err) {
            console.error(err);
            return;
          }
          const root = HTMLParser.parse(data);
          const name = interaction.fields.getTextInputValue("newItemName");
          let description =
            interaction.fields.getTextInputValue("newItemDescription");
          const image = interaction.fields.getTextInputValue("newItemImage");
          const price = interaction.fields.getTextInputValue("newItemPrice"); // Check if the image is a valid URL

          if (!image.match(/\.(jpeg|jpg|gif|png|webp)(\?.*)?$/)) {
            await interaction.reply({
              content: `Invalid Image URL. Make sure to use either (.jpeg, .jpg, .gif, .png, or .webp)`,
              ephemeral: true,
            });
            return;
          }

          const items = root.querySelectorAll(".wishlist-item");
          const itemExists = items.find(
            (item) => item.querySelector(".item-name").text === name
          );
          if (itemExists) {
            await interaction.reply({
              content: `Item: ${name} Already Exists!`,
              ephemeral: true,
            });
            return;
          }

          const wishlist = root.querySelector(".wishlist-item").clone();
          wishlist.querySelector(".item-img > img").setAttribute("src", image);
          const item = wishlist.querySelector(".item-details");
          item.querySelector(".item-name").set_content(name); // Check if the description has a link then add the link

          if (description.includes("http")) {
            description = description.replace(
              /(https?:\/\/[^\s]+)/g,
              '<a href="$1">$1</a>'
            );
            item.querySelector(".item-description").set_content(description);
          } else {
            item.querySelector(".item-description").set_content(description);
          }
          item.querySelector(".item-price").set_content("€" + price);
          root.querySelector(".wishlist").appendChild(wishlist);
          fs.writeFile(
            "../Website/index.html",
            root.toString(),
            async (err) => {
              if (err) {
                console.error(err);
                interaction.reply({
                  content: `Failed to Update and Upload Item: ${name}`,
                  ephemeral: true,
                });
                return;
              } else {
                interaction.reply({
                  content: `Item: ${name} Added and Uploaded!`,
                  ephemeral: false,
                });
              }
            }
          );
        });
      }
    }
  },
};
Note that the Index.html file will need to have a structure like this. With all the specified classes and IDs:
<!DOCTYPE html>
<html lang="en">
<head>
    <meta charset="UTF-8">
    <meta name="viewport" content="width=device-width, initial-scale=1.0">
    <title>Wishlist</title>
    <link href="./style/index.css" rel="stylesheet">
</head>
<body>
    <div class="top-strip">
        <a href="https://github.com/Arisamiga/Wishlist" target="_blank">This is a Demo! Click here to return to repository for the project</a>
    </div>
        <ul class="wishlist">
            <li class="wishlist-item">
                <div class="item-img"><img src="https://placehold.co/150.png" alt="Item Image"></div>
                <div class="item-details">
                    <div class="item-name">Item 2</div>
                    <div class="item-description">Description of item 2</div>
                    <div class="item-price">€20.00</div>
                </div>
            </li>
            <li class="wishlist-item">
                <div class="item-img"><img src="https://placehold.co/150.png" alt="Item Image"></div>
                <div class="item-details">
                    <div class="item-name">Item 3</div>
                    <div class="item-description">Description of item 3</div>
                    <div class="item-price">€30.00</div>
                </div>
            </li>
        <li class="wishlist-item">
                <div class="item-img"><img src="https://placehold.co/150.png" alt="Item Image"></div>
                <div class="item-details">
                    <div class="item-name">Item 1</div>
                    <div class="item-description">Description of item 1</div>
                    <div class="item-price">€10.00</div>
                </div>
            </li></ul>
    </div>
</body>
</html>
So now we can start by creating a command to remove items from the wishlist using as well the same system for parsing the html and then rewriting the html file with the parsed values.
require("dotenv").config();
const {
  StringSelectMenuBuilder,
  StringSelectMenuOptionBuilder,
  SlashCommandBuilder,
  ActionRowBuilder,
} = require("discord.js");
const HTMLParser = require("node-html-parser");
const fs = require("fs");
module.exports = {
  data: new SlashCommandBuilder()
    .setName("remove")
    .setDescription("Remove a wishlist item"),
  async execute(interaction) {
    fs.readFile("../Website/index.html", "utf8", async (err, data) => {
      if (err) {
        console.error(err);
        return;
      }
      const root = HTMLParser.parse(data);
      const items = root.querySelectorAll(".wishlist-item");
      const select = new StringSelectMenuBuilder()
        .setCustomId("starter")
        .setPlaceholder("Make a selection!")
        .addOptions(
          items.map((item) => {
            return new StringSelectMenuOptionBuilder()
              .setLabel(item.querySelector(".item-name").text.slice(0, 100))
              .setValue(item.querySelector(".item-name").text.slice(0, 100))
              .setDescription(
                item.querySelector(".item-description").text.slice(0, 100)
              );
          })
        );
      const row = new ActionRowBuilder().addComponents(select);

      const response = await interaction.reply({
        content: "Select an item to remove",
        components: [row],
      });
      const collectorFilter = (i) => i.user.id === interaction.user.id;
      try {
        const choice = await response.awaitMessageComponent({
          filter: collectorFilter,
          time: 60_000,
        });
        if (!choice.isStringSelectMenu()) {
          await choice.reply({
            content: "Invalid selection, cancelling",
            ephemeral: true,
          });
          return;
        }
        const item = items.find(
          (item) => item.querySelector(".item-name").text === choice.values[0]
        );
        if (!item) {
          await choice.reply({
            content: "Item not found, cancelling",
            ephemeral: true,
          });
          return;
        }
        item.remove();
        fs.writeFile("../Website/index.html", root.toString(), async (err) => {
          if (err) {
            console.error(err);
            choice.reply({ content: "Failed to remove item", ephemeral: true });
            interaction.editReply({
              content: `Failed to Remove and Upload Item: ${choice.values[0]}`,
              components: [],
            });
            return;
          } else {
            interaction.editReply({
              content: `Removed Item and Updated: ${choice.values[0]}`,
              components: [],
            });
            choice.reply({ content: "Item removed", ephemeral: true });
          }
        });
      } catch (e) {
        await interaction.editReply({
          content: "Choice not received within 1 minute, cancelling",
          components: [],
        });
      }
    });
  },
};
We are basically using the same logic as the add command but in reverse and we are using item.remove() to remove the item from the wishlist and then write the file back to the index.html file.
In this we can use a dropdown function also found in discordjs or StringSelectMenuBuilder.
More can be found here https://discordjs.guide/message-components/select-menus.html
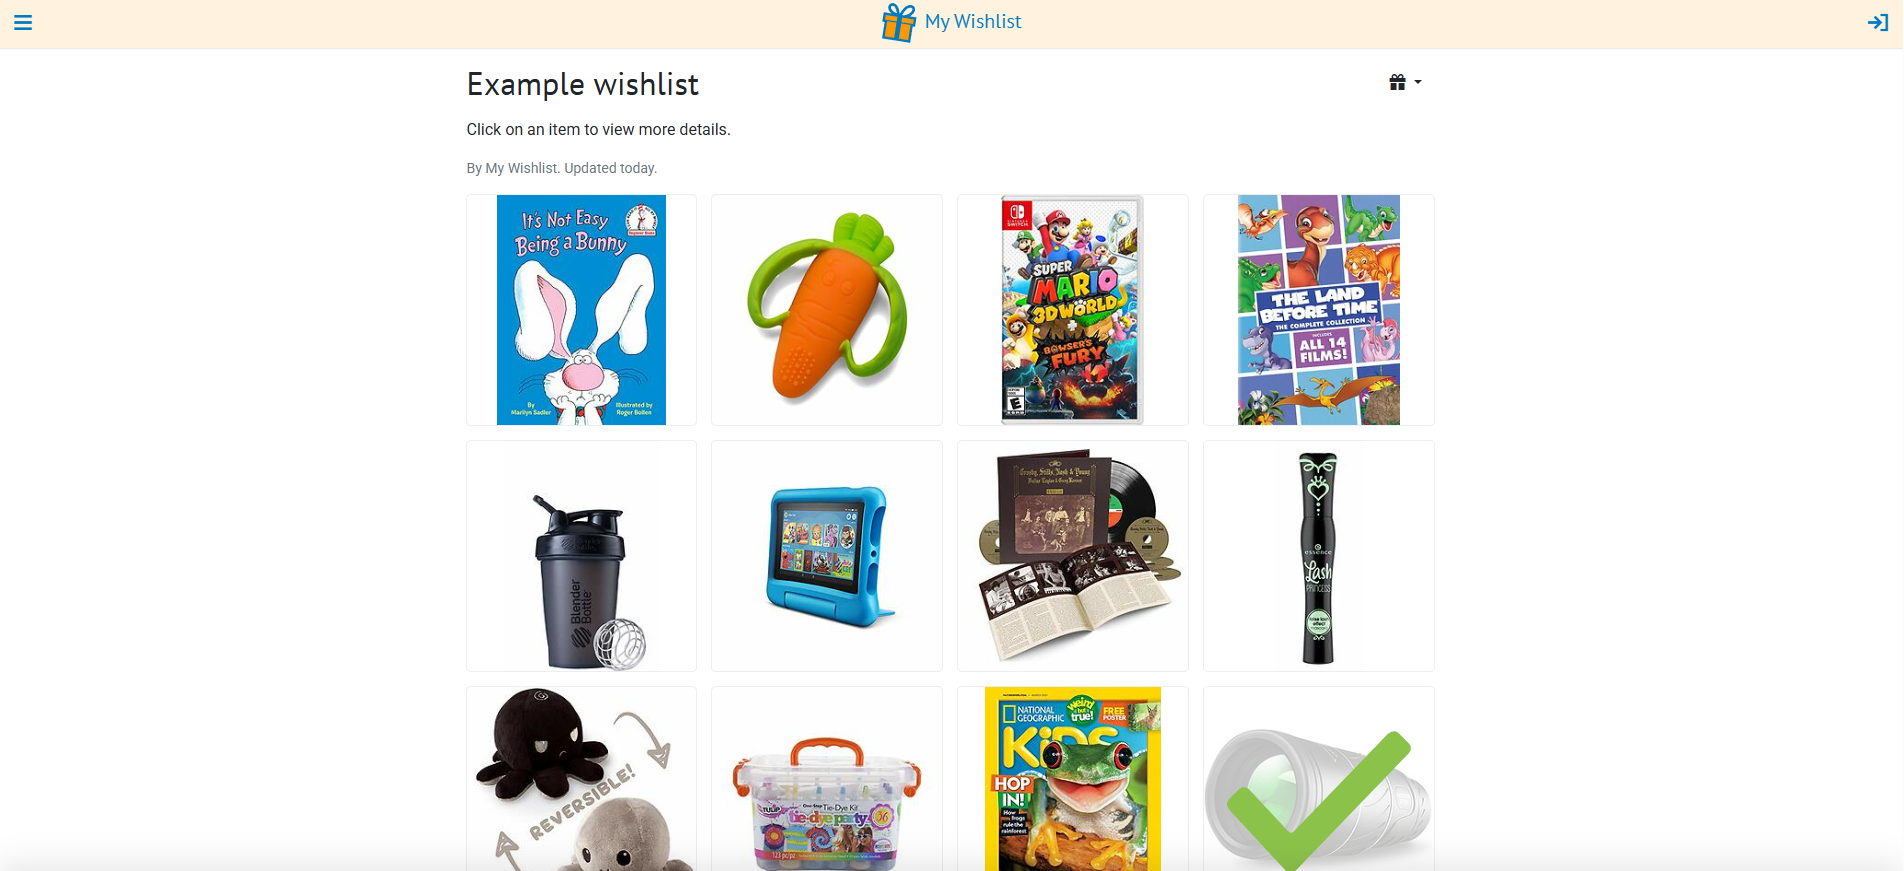
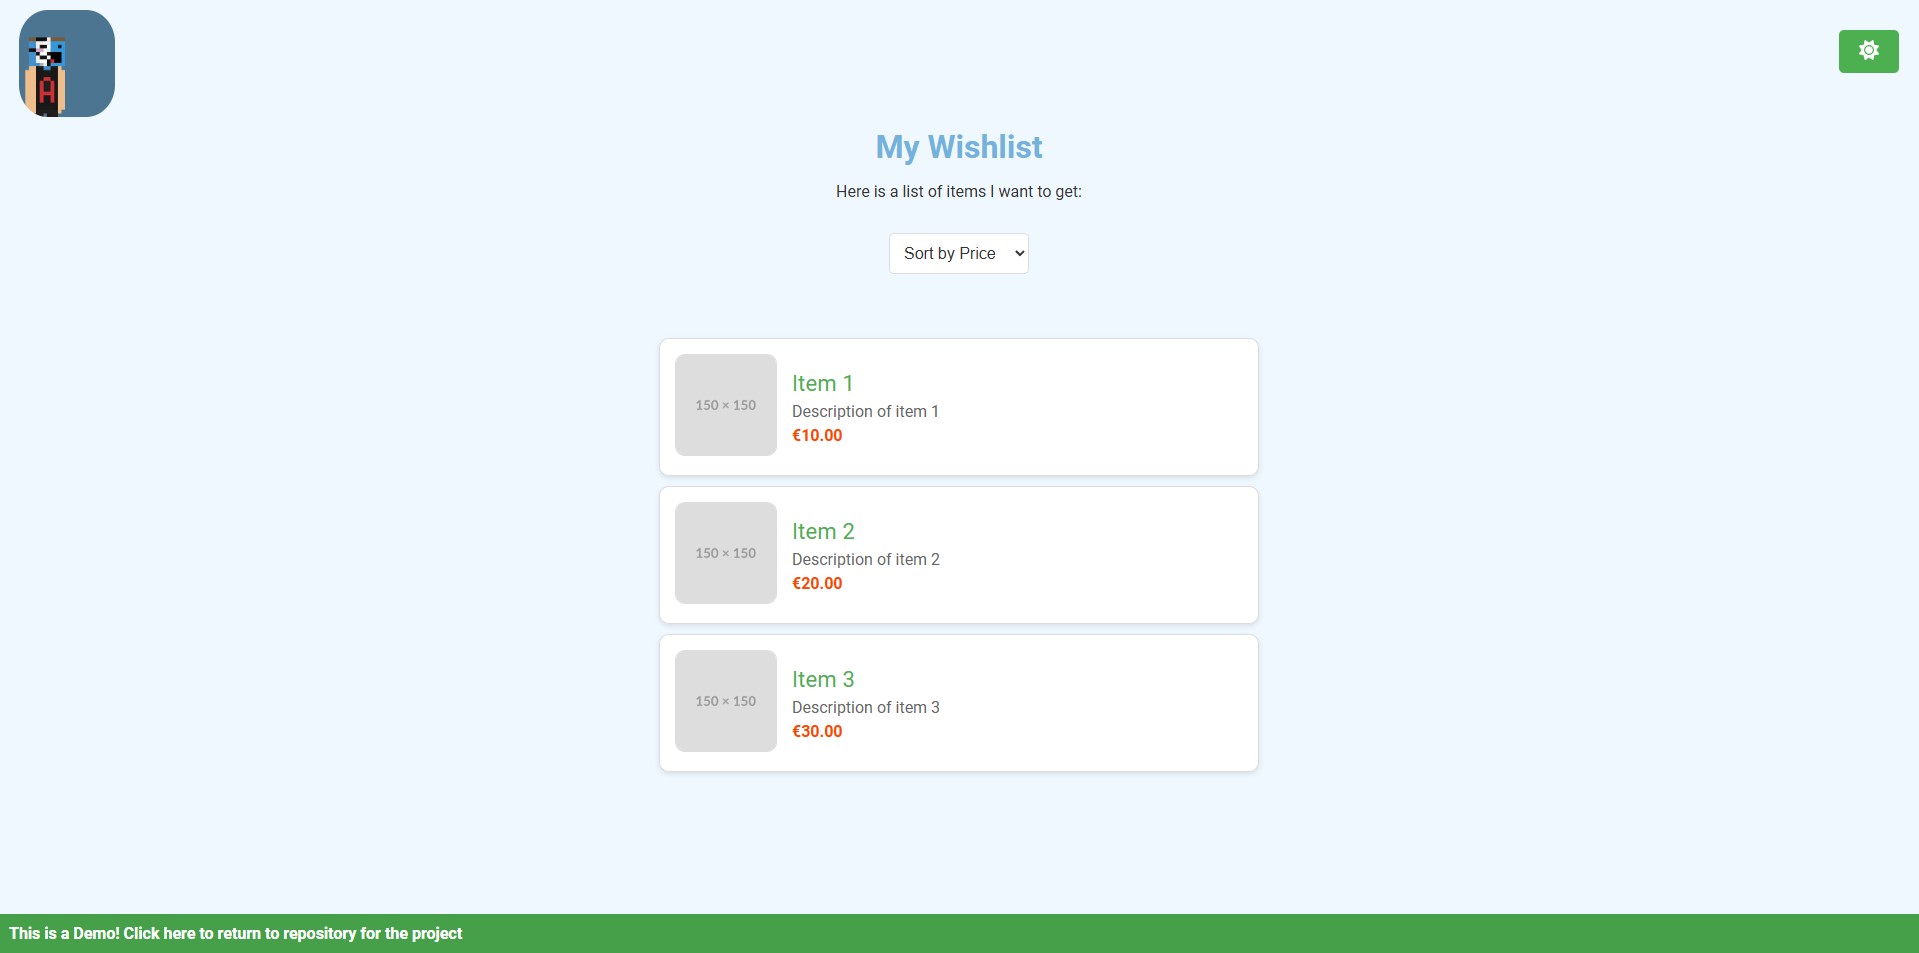
And with adding some styling to the index.html on the Github Repository we have our wishlist website!!
The code can be found here: https://github.com/Arisamiga/wishlist
Also, I was also able to add a git ability so it can be run locally and based on the /.git/ folder it can be deployed to a website like Vercel or Netlify or to Github to use with Github Pages.
I am able to achieve that using simple-git
Here is an example of a change I made in the add command to add the git ability:
const simpleGit = require('simple-git');
const git = simpleGit();

...

async function uploadChanges(itemRemoved) {
    try {
        // Check if there are any updates to the repo then pull
        const status = await git.status();
        let hasChanges = status.files.length > 0;

        if (hasChanges) {
            await git.stash();
 }

        await git.pull('origin', process.env.GIT_BRANCH);

        const stashList = await git.stashList();
        if (stashList.total > 0) {
            await git.stash(['pop']);
 }

        // Add changes, commit, and push
        await git.add('../');
        const finalStatus = await git.status();
        if (finalStatus.files.length > 0) {
            await git.commit(`Added ${itemRemoved} to the wishlist`);
            await git.push('origin', process.env.GIT_BRANCH);
 }
        return true;
 } catch (err) {
        console.error(err);
        return false;
 }
}

fs.writeFile('../Website/index.html', root.toString(), async (err) => {
    if (err) {
        console.error(err);
        interaction.reply({ content: `Failed to Update and Upload Item: ${name}`, ephemeral: true });
        return;
 } else {
        const enableGitUpdates = process.env.ENABLE_GIT_UPDATES && process.env.ENABLE_GIT_UPDATES.toLowerCase() !== 'false';
        if (!enableGitUpdates) {
            interaction.reply({ content: `Item: ${name} Added!`, ephemeral: false });
            return;
 }

        if (await uploadChanges(name))
            interaction.reply({ content: `Item: ${name} Added and Uploaded!`, ephemeral: false });
        else
            interaction.reply({ content: `Failed to Update and Upload Item: ${name}`, ephemeral: true });
 }
});
Before pushing any changes to the git repository we will need to check if there are any changes and then pull the changes from the repository to avoid any conflict before modifying the index.html file.
We will then add the changes, commit and push the changes to the repository.
So now we have created our own wishlist website and it can be managed essentially from your phone or your computer using Discord!
You can access it from here if you would like https://wishlist.arisamiga.rocks/demo/
I hope you enjoyed our amazing section on “I can make that”!!
Now… I wanted to mention that I will be taking an intermission from my blog till around June/July (As you might have noticed from the lack of schedule in my postings these past months). That will not necessarily mean I will not be posting anything, I will try to post some small posts of some projects that I am working on but as June approaches I need to have my main focus on my exams, and then after that I will be able to work more on my projects which is something I really look forward to, especially some projects that I have not been able to maintain because of my studies.

But I shall see you soon! Hope you enjoyed this post and Thanks so much for reading :D